Tuesday, April 16, 2024

April Layout Share - My Creative Scrapbook

  Hello friends.

The beautiful My Creative Scrapbook April Main Kit featured the Making The Best Of It collection from Pinkfresh Studios. While the colors are spring like, this kit is versatile enough for every day and vacation photos as you will see.

 Let me show you what I made...

1.  Sharing This Beautiful Story - I cut this scallop pattern paper all apart and arranged it into a heart which framed my photo perfectly. Watch my YouTube process video to see how you can adhere the vellum floral ephemera bits down without the glue showing through,


2. LOVE, I Want To Be Everywhere With You - My daughter recently went to Costa Rica  for a friend's destination wedding. I couldn't help but scrap this gorgeous photo of her and her boyfriend. Again, I cut a sheet of chevron pattern paper all apart and rearranged it to frame my photo. Lots and lots of machine stitching on this one!


3. This Was Meant To Be - Another layout documenting my newest grand fur baby's gotcha day. I used the April monthly sketch by Laura Whitaker.


4. Spring Is In The Air - I couldn't help but use this gorgeous cut file from The Cut Shoppe that was included with the April kit subscription. I backed the cut file with one of the pattern  papers from the Making The Best Of It collection. The mixed media background sheet is from 49th and Market that came from my stash. Aren't these the cutest pics of my grandson enjoying a ride in a swing?


My Creative Scrapbook puts together 4 kits every month. I used the Main kit. Each kit is put together beautifully. There is really something for every kind of scrapbooker! Go check them all out.

Thanks so much for stopping by.
~Marcia

Friday, March 15, 2024

March Layout Share - My Creative Scrapbook

 Hello friends.

The beautiful My Creative Scrapbook March Main Kit featured the Simple Stories Fresh Air collection. Even though the winter here in Minnesota was mild, it was refreshing to work with a Spring collection.

 Let me show you what I made.

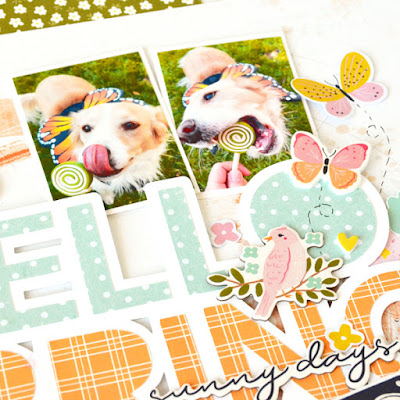
1. Hello Spring - This awesome Hello Spring cut file is included in your kit subscription and is from The Cut Shoppe. The background paper from 49 and Market is from my stash. Watch My YouTube process video for all the details on this fun layout.


2. Sunny Days - I had to scrap these fun playground pics of my grandson from last Fall. He loves to climb on everything!


3. Family - The March Main kit include the Simple Stories Family Page Kit and it worked well with the Simple Stories Fresh Air pattern papers. 


4. You Make Me Happy - I haven't created a mixed media layout in a while using my acrylic paints and decided to have some fun and create some drips. Watch my YouTube process video to see how this fun layout came together. I used the monthly sketch by Laura Whitaker for this layout. I added canvas flair  from Scrappin Happy Studio.


My Creative Scrapbook puts together 4 kits every month. I used the Main kit. Each kit is put together beautifully. There is really something for every kind of scrapbooker! Go check them all out.

Thanks so much for stopping by.
~Marcia


Friday, February 9, 2024

February Layout Share - My Creative Scrapbook

 Hello friends.

The My Creative Scrapbook February Main Kit featured the Simple Stories Winter Wonder collection as well as some Echo Park Paper papers from Winterland and Chipboard frames from Echo Park Paper Winter collection.  Even though these were Winter collections, there were some floral, plaid, and gingham pattern papers so the kit was versatile enough for more than just your cold weather photos. Let me show you what I made.


1. Snow Much Fun - The Snow Much Fun cut file is included in your kit subscription and is from PearTree Cut Files. I cut the title large, inked and stitched it and placed it on a stenciled background. You can hear all about my process on my YouTube process video here...


2.  Oh So Cold - I used the monthly sketch by Rebecca Moore as the starting point for the design of this layout. I moved up the two side banners otherwise they would have been mostly covered up with my embellishments.


3. She Said Yes! - I took advantage of the plaid and floral pattern papers to do a non winter layout of my son's engagement. We are delighted for them. This layout is based on the monthly sketch by Laura Whitaker. I substituted a heart cut file from a past kit in place of the circle on the sketch. The heart worked better for my photos.


4. This Smile - I adore this photo of my niece. Her mom would not dress her in any pink, so I thought the green florals and gingham would be perfect for scrapping this photo. The adorable bunny and more floras from the ephemera die pack worked well on this layout.


My Creative Scrapbook puts together 4 kits every month. I used the Main kit. Each kit is put together beautifully. There is really something for every kind of scrapbooker! Go check them all out.

Thanks so much for stopping by,
~Marcia


Wednesday, January 10, 2024

January Layout Share - My Creative Scrapbook

 Hello friends.

The My Creative Scrapbook January Main Kit featured the Vicki Boutin Discover and Create collection from American Crafts. The kit was also packed with lots of embellishment options including two packages of die cut ephemera, cardstock stickers, foam stickers, and alphas. It was a joy to create with this kit! Let me show you what I made.

1. Happiest Days -I fussy cut a whole sheet of floral pattern paper and used those flowers on this layout of my daughter and I attending a concert at Red Rocks.  This layout was created with a sketch provided by Rebecca Moore for My Creative Scrapbook. Watch my YouTube video to hear how the evening started out so fun and ended with us running for the car in a downpour when it started to hail. 


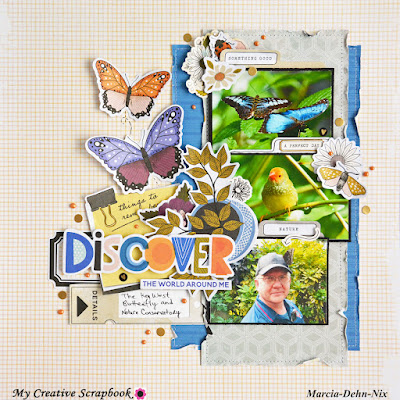
2. Discover The World Around Me - This layout used the monthly My Creative Scrapbook sketch by Laura Whitaker. I am scrapping some photos from the Key West Butterfly and Nature Conservatory. Lots of layers makes this eyecatching.


3. Our Story - This layout was inspired by one of the digital cut files included with the kit subscription,  Home Sweet Home from The Cut Shoppe and Our Story also from the Cut Shoppe. I decided to make a neighborhood of houses and tuck my first house in there. I had just graduated from college and my husband was fresh out of the Marine Corps. We didn’t have $$ for a down payment but a builder let us do sweat equity… we shingled the roof, put the siding on, did all the painting and staining! Both our families helped with the work and we are so grateful. I tucked the story behind a house because it was a short novella and I didn't want to cover up to much of my layout with journaling. 


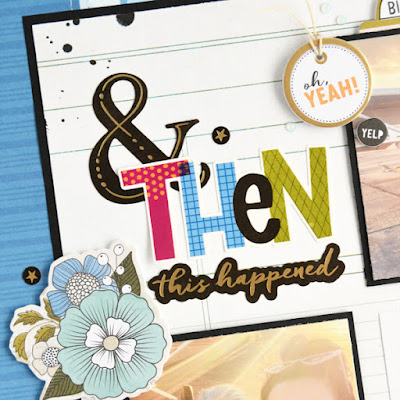
4. & Then This Happened - You can't go wrong with a grid design. To make things interesting I used strips of pattern paper on my background. These photos are from our last trip to visit my daughter and her partner took us flying!


My Creative Scrapbook puts together 4 kits every month. I used the Main kit. Each kit is put together beautifully. There is really something for every kind of scrapbooker! Go check them all out.

Thanks so much for stopping by,
~Marcia


Monday, December 25, 2023

Holiday Cards - Lori Whitlock

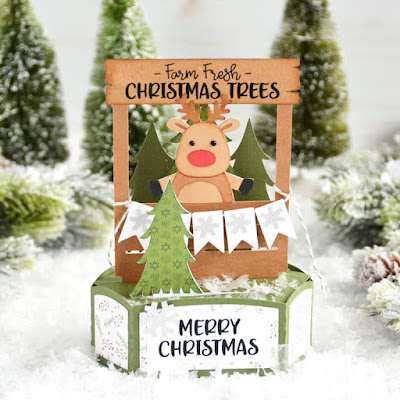
 Hello everyone! Marcia here today. I have some holiday cards to share with you today. No, it’s not too late to make and send holiday cards! New Year is a holiday so for me, it’s ok to send a card after Christmas. I love to send holiday cards to friends and family as well as receive them. I especially love a box card that can sit on a tabletop or counter and doubles as home decor. This Hexagon Pop-Up Christmas Tree Booth With Reindeer Card (SVGSilhouette)  and the Hexagon Pop-Up Santa's Workshop Card (SVGSilhouettecut files can be found in Lori’s Store along with many other varieties of holiday cards. I used the new Echo Park Paper Have A Holly Jolly Christmas collection.


Stop by the Lori Whitlock YouTube channel for  tutorial instructions on how to assemble the hexagon pop-up cards. Don’t worry about how you will mail it, because these awesome cards fold flat for mailing.
 
Thanks so much for stopping by,
~Marcia

Thursday, December 14, 2023

Santa Lighted Shadowbox Decor - Lori Whitlock Tutorial
 Hello friends. 

I am sharing a tutorial on the blog today for the new Holiday Lighted Shadowbox Decor pieces. You can purchase a bundle Here that includes a Turkey, Santa, Reindeer, Elf, Snowman, and Nativity Scene. I made the Santa (SVG, Silhouette) and boy is he spectacular!


These are pretty easy to assemble. Let me show you how.

1. Cut out all the pieces from desired pattern paper or cardstock. Be sure to scroll in Silhouette Studio to see all the pieces. There are 4 inserts, side panels, and the decorated front and back. We are going to assemble the side and back first Adhere your pattern paper panels to the cardstock back and sides.


2. Glue one side panel in place, adhering it to the tab with the four slits and then each tab working your way around to the other tab with four slits on the opposite side
.

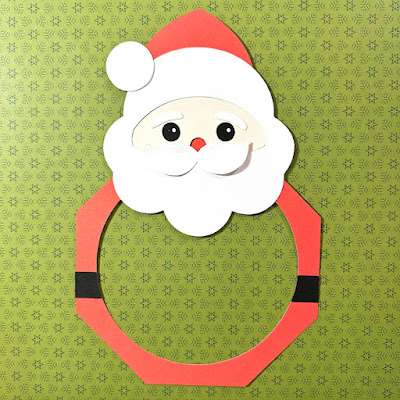
3. Let's assemble the front panel. We are going to start with Santa's face. The white paper goes behind the black. That goes behind the flesh colored face. Last, attach his eyebrows over each eye.


4. Adhere the black belt pieces on each side and the bottom of the beard. This allows you to fit the face piece in just so tucked under the mustache. Once the face is in there, go ahead and adhere the hat brim down along with the white pompom. Lastly, add the mustache.


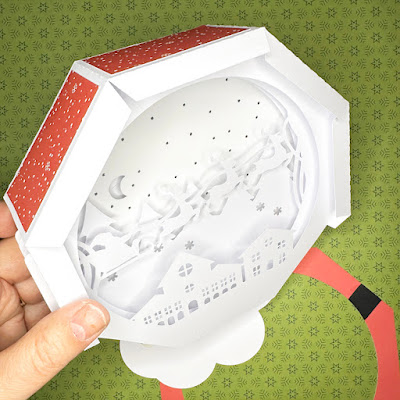
5. We are ready to assemble the inside of the shadowbox. Take the back panel with the moon and start and slide the tabs through the slit in the back on each side. You want the hole in the back piece to be on the bottom.

6. Repeat with the other inserts.


7. Once the inserts are in place we can adhere the final side in place the same as the other side.


8. Adhere the front Santa panel to the front of the shadowbox. I did this a few tabs at a time. Then your Santa is ready for some lights or if you prefer you can leave it as is.


Thanks so much for stopping by. Be sure to check out all of Lori's latest designs in her shop.
~Marcia